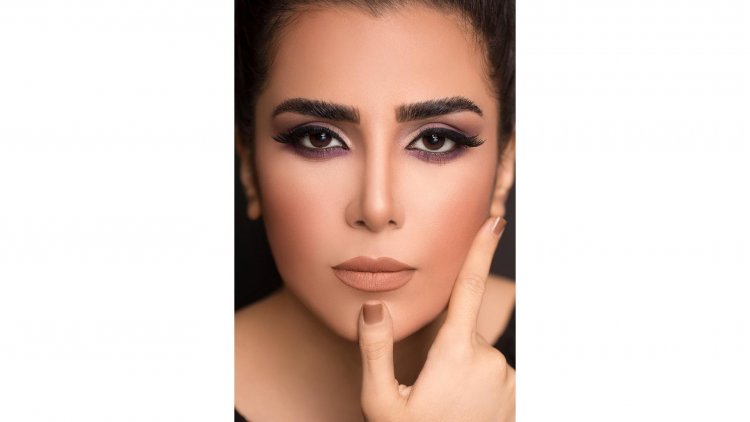
Unveil the Allure: Crafting the Perfect Smoky Eye
Creating the perfect smoky eye can be a transformative experience. This iconic makeup look is not only versatile but also timeless, making it a staple in many beauty routines. Whether you're preparing for a night out or just want to elevate your everyday makeup, mastering the smoky eye technique can enhance your natural beauty with a touch of sophistication. Below, we’ll break down the process step-by-step, from preparation to finishing touches, ensuring you achieve a flawless and captivating smoky eye every time.
Essential Tools and Products
Before diving into the application process, it’s crucial to gather all the necessary tools and products. Here’s a list of what you’ll need:
Makeup Brushes
- Flat Shader Brush - Ideal for applying eyeshadow on the lid.
- Blending Brush - For seamlessly blending eyeshadow and softening harsh lines.
- Angled Brush - Perfect for applying eyeliner or eyeshadow along the lower lash line.
- Small Detailing Brush - Useful for precise application and detail work.
Eyeshadow
- Base Shadow - A neutral shade that matches your skin tone or is slightly darker.
- Mid-Tone Shadow - A slightly darker shade to create depth.
- Dark Shadow - The key shade for the smoky effect, typically in black, charcoal, or deep brown.
- Highlight Shadow - A light, shimmery shade for the inner corner and brow bone.
Eyeliner
- Pencil or Gel Liner - For lining the upper and lower lash lines.
- Liquid Liner - Optional, for adding extra definition if desired.
Mascara
- Volumizing Mascara - To make your lashes look fuller and more dramatic.
Primer and Setting Spray
- Eye Primer - Helps the eyeshadow adhere better and last longer.
- Setting Spray - To ensure your makeup stays in place throughout the day or night.
Step 1: Preparation and Priming
To start, proper preparation is key. Begin by cleansing your face and applying your regular skincare routine.
Prime Your Eyelids
Apply an eye primer to your eyelids. This step is crucial as it creates a smooth base for eyeshadow application, prevents creasing, and ensures your makeup lasts longer. Use your ring finger or a small brush to apply a thin layer of primer from your lash line to your brow bone.
Map Out Your Smoky Eye
Before applying any products, it helps to map out where each color will go. This will guide you throughout the process and ensure you achieve the desired look. Use a light pencil or a brush to lightly sketch out where the dark shadow will be applied.
Step 2: Applying the Base Shadow
Choose a Neutral Base Shadow
Pick a neutral eyeshadow that matches your skin tone or is slightly darker. Using a flat shader brush, apply this shade all over your eyelid. This step sets the base for the smoky eye and provides an even canvas for the other colors.
Blend the Base
Once applied, use a clean blending brush to blend the base shadow into the crease. This creates a smooth transition and helps to avoid any harsh lines.
Step 3: Adding Depth with Mid-Tone Shadow
Select a Mid-Tone Shade
Choose a mid-tone shadow that is a few shades darker than your base shadow. This will add depth and dimension to your eyes.
Apply and Blend
Using a clean blending brush, apply the mid-tone shadow to the crease of your eyelid. Start from the outer corner and blend inward, using windshield wiper motions. Ensure the color is well-blended to create a gradient effect from the base to the darker shades.
Build Intensity
If needed, build up the intensity of the mid-tone shadow gradually. This layering technique allows you to control the depth and achieve the perfect smoky effect.
Step 4: Creating the Smoky Effect with Dark Shadow
Choose Your Dark Shadow
Select a dark eyeshadow shade. Black, charcoal, and deep brown are popular choices for achieving a classic smoky look.
Apply the Dark Shadow
Using a flat shader brush, apply the dark shadow to the outer corner of your eyelid, extending it slightly into the crease. Pat the shadow on to build up the color intensity, and then use a clean blending brush to blend the edges. This will soften any harsh lines and ensure a seamless transition between colors.
Intensify and Blend
For a more dramatic look, you can build up the dark shadow. Apply additional layers as needed, and blend thoroughly to ensure a smooth gradient.
Step 5: Defining the Eyes
Line Your Upper Lash Line
Using a pencil or gel eyeliner, line your upper lash line. For a more intense smoky eye, you can also line the lower lash line. Smudge the liner slightly using a small detailing brush to blend it into the eyeshadow.
Optional: Add Liquid Liner
For added definition, you can apply liquid liner on top of the pencil or gel liner. This step is optional but can give a more dramatic effect.
Step 6: Highlighting and Finishing Touches
Apply Highlight Shadow
To brighten your eyes and complete the look, apply a highlight shadow to the inner corners of your eyes and under your brow bone. Use a small brush to apply the highlight shadow, and blend it gently to avoid stark lines.
Apply Mascara
Finish off the look by applying a volumizing mascara to your upper and lower lashes. This will enhance the smoky eye effect by adding volume and making your eyes stand out even more.
Clean Up and Set
Check for any fallout or imperfections around your eyes. Use a clean brush or a cotton swab to correct any mistakes. Finally, set your makeup with a setting spray to ensure it stays in place throughout the day or night.
In the following section, we will delve deeper into additional tips and tricks for perfecting your smoky eye, including how to tailor the look for different eye shapes, how to choose the best colors for your skin tone, and advice on removing your smoky eye makeup. Stay tuned to complete your mastery of this classic beauty look.
Perfecting Your Smoky Eye: Tips, Tricks, and Customizations
Congratulations! You've already mastered the basic steps to achieving a stunning smoky eye. Now, let’s refine your technique with additional tips and tricks that will elevate your look, ensure it complements your unique eye shape, and offer advice on color choices and makeup removal.
Tailoring the Smoky Eye to Different Eye Shapes
Almond Eyes
If you have almond-shaped eyes, you have a lot of flexibility with your smoky eye look. You can follow the basic steps mentioned previously, but consider these adjustments:
- Extend the Dark Shadow: For a more dramatic effect, extend the dark shadow slightly beyond the outer corners of your eyes. This elongates the eye and adds to the overall smoky allure.
- Focus on the Crease: Apply the mid-tone shadow more prominently in the crease and blend it upwards to create depth.
Hooded Eyes
Hooded eyes require a few tweaks to ensure the smoky eye is visible and flattering:
- Apply Base Shadow Above the Crease: Since the crease might be hidden when your eyes are open, apply your base and mid-tone shadows slightly above your natural crease.
- Blend Carefully: Use a small, precise blending brush to ensure that the smoky effect is visible even when your eyes are open. Avoid applying the dark shadow too low on the lid.
Round Eyes
To create an elongated effect for round eyes, try these tips:
- Wing Out the Dark Shadow: Apply the dark shadow in a winged shape to elongate your eyes and create an alluring cat-eye effect.
- Use a Light Hand: Blend the dark shadow outward and slightly upward to avoid making your eyes appear smaller.
Deep-Set Eyes
For deep-set eyes, the goal is to bring the eyes forward and add dimension:
- Apply Dark Shadow to the Lid: Use the dark shadow more generously on the lid and blend it outwards. This helps bring the eyes forward.
- Highlight the Brow Bone: Apply a generous amount of highlight shadow under the brow bone to enhance the eye area and create a contrast.
Choosing Colors for Your Smoky Eye
Fair Skin Tones
- Warm Neutrals: Soft taupes, browns, and golds can complement fair skin tones beautifully. These colors add warmth without overwhelming the complexion.
- Cool Tones: For a more dramatic look, consider cool-toned shades like charcoal and slate gray. Pair with a light highlighter to balance the look.
Medium Skin Tones
- Rich Browns and Coppers: Medium skin tones can handle richer shades like deep browns and coppers. These colors enhance the natural warmth of your skin.
- Bold Colors: Don’t shy away from bold colors like plum or deep blue. These shades provide a striking contrast against medium skin.
Dark Skin Tones
- Deep Colors: Dark skin tones can pull off deeper shades like black, navy, and deep purple. These colors provide a beautiful contrast and make the smoky eye stand out.
- Vibrant Shades: Bright colors like emerald green or electric blue can also be stunning on darker skin tones. They add a pop of color while maintaining the smoky effect.
Tips for Removing Your Smoky Eye Makeup
A smoky eye is a glamorous choice, but removing it can sometimes be tricky. Here’s how to do it effectively:
Use a Gentle Makeup Remover
- Micellar Water: This is a great option for removing makeup gently without irritating the skin. Soak a cotton pad in micellar water and hold it against your eye for a few seconds before wiping away.
- Oil-Based Remover: An oil-based remover is particularly effective at breaking down waterproof products and heavy layers of makeup.
Be Gentle
- Avoid Rubbing: Use gentle motions when removing makeup to avoid irritating the delicate skin around your eyes. Pat rather than rub.
- Double Cleanse: Follow up with your regular facial cleanser to ensure all traces of makeup are removed.
Aftercare
- Moisturize: Apply a nourishing eye cream or moisturizer to the eye area after removing makeup. This helps to soothe and hydrate the skin.
Mastering the smoky eye look involves not just applying the right products but also customizing the technique to fit your unique features and preferences. By tailoring the look to your eye shape, choosing flattering colors, and following effective removal practices, you can ensure that your smoky eye always looks its best and leaves a lasting impression.
Disclaimer
The content shared on this blog is intended for informational purposes only. Consulting a professional about the highlighted information is recommended. The blog and its authors are not liable for any adverse effects or consequences resulting from the use of the methods or products provided. Always prioritize your health and safety.
What's Your Reaction?